The community is working on translating this tutorial into Lao, but it seems that no one has started the translation process for this article yet. If you can help us, then please click "More info".
Creating a Controller
In the last article, we created our very first ASP.NET MVC project. It had built-in functionality to display a simple message to the world, but we obviously want more than that! The first thing that would be relevant to add to your new, almost empty MVC (Model-View-Controller) project is a Controller.
As we talked briefly about earlier, the Controller acts as the middleman - it will combine your Model with a View and serve the result to the end-user. However, neither a Model nor a View is required - the Controller can act on its own for the most basic operations, e.g. delivering a simple text message or redirecting the user to somewhere else.
However, there are a few things we need to do before adding a new controller to our project.
Adding MVC support to a Web project
In the previous article, we created a new web project using an empty template. This leaves us with a very basic web application, so we need to add MVC support to it, to let the .NET framework and the web server know how to process incoming requests etc. Remember the Startup.cs file which we modified in the previous article? It's time to open it up again in Visual Studio and look for the ConfigureServices method. It's currently empty, but let's change that by adding the following line to it:
services.AddMvc();The method should now look like this:
public void ConfigureServices(IServiceCollection services)
{
    services.AddMvc();
}
We also need to modify the Configure() method - previously, it contained some code to output our "Hello, MVC world!" message, but we want our new Controller to handle this task in the future. Your web application needs to know how to map incoming requests to your controllers and for this, it uses the concept of routes. We will talk a lot more about routing later on, because it's a slightly complex subject, but for now, we will use a couple of lines of code, found at the bottom of the below code example, to add default routing to the application. So, modify your Configure() method in the Startup.cs file so that it looks like this:
public void Configure(IApplicationBuilder app, IWebHostEnvironment env)
{
    if(env.IsDevelopment())
    {
    app.UseDeveloperExceptionPage();
    }

    app.UseRouting();
    app.UseEndpoints(endpoints =>
    {
    endpoints.MapDefaultControllerRoute();
    });
}
Now we're finally ready to add our first Controller!
Adding a Controller
The project structure of an MVC application is up to you - you can place all the controllers, models, views and other files in the root if you want to. However, it's usually a good idea to split things up in relevant folders, e.g. a "Controllers" folder for your controllers, a "Views" folder for your views and so on. Once you get used to a certain structure, whether it's a common one or one you have made up your self, you will find it a lot easier to navigate your project and work with the files.
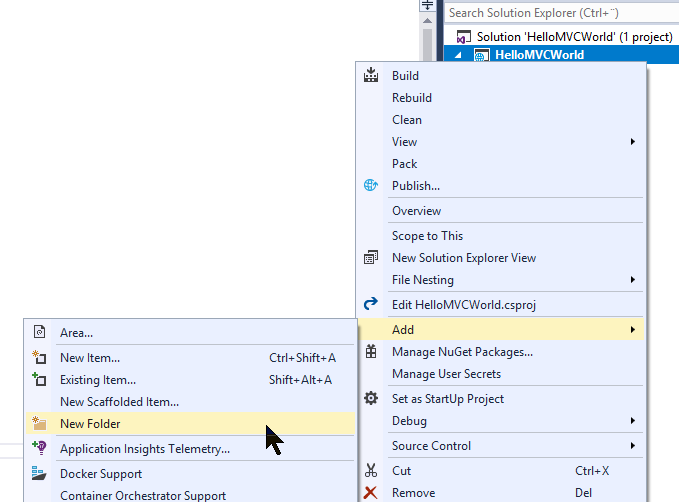
So, to get started, let's add a new folder to your project called "Controllers". Right-click on your project in the Solution Explorer and select Add -> New Folder, like this:

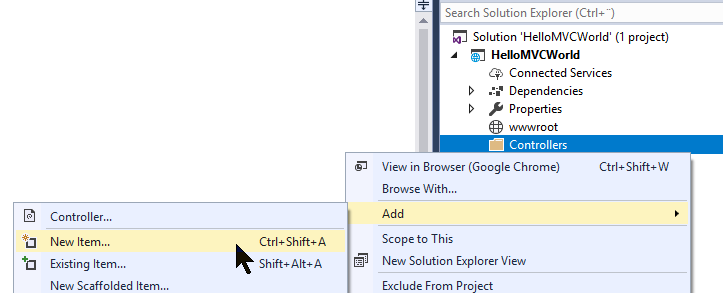
A dialog will pop up, requesting a name for the new folder - just enter "Controllers". With that in place, we can now finally add our very first Controller to the project. Just right-click the new folder and select Add -> New Item..., like this:

Visual Studio will offer to apply scaffolding to your new controller, which basically means that it can be created with a range of methods for doing various stuff. However, this tutorial is all about doing things from scratch, so you should select the one called something like "MVC Controller - Empty" and then click the Add button.
A dialog will pop up, requesting a name for the new controller. We would like to call it "HomeController", so enter that into the dialog and press Ok. A new Controller will be generated for you and it will look like this:
using System;
using System.Collections.Generic;
using System.Linq;
using System.Threading.Tasks;
using Microsoft.AspNetCore.Mvc;

namespace HelloMVCWorld.Controllers
{
    public class HomeController : Controller
    {
    public IActionResult Index()
    {
        return View();
    }
    }
}
As you can see, it looks like a regular C# class. It inherits the Controller class, which is how the .NET frameworks know that this class is to be treated as an MVC Controller. It has one method called Index(), which will try to return the default view by calling the View() method. The .NET framework will be able to find the proper view, if it exists, in one of the many places that it automatically looks for views. However, we have not reached the part of the tutorial where views are introduced, so let's instead change the method to return the, now famous, "Hello, MVC world!" message. Change the single line of the method so that it now looks like this:
public IActionResult Index()
{
    return Content("Hello, MVC world!");
}
That's all we need - we now have a Controller with an Index() method, which will be called when you run your project, thanks to the default routing we applied previously. Press F5 to run your project and see for your self - you should see our greeting to the world as soon as the default browser is launched.
Summary
We have now created the first part of an MVC project: The Controller. Real projects will likely contain more than just the one controller, but let's stick with it for now and then proceed to the next articles, where we will introduce first the View and then the Model. At this point, MVC might seem overly complicated, but as soon as you understand the basic principles, it will all start to make sense.
Also, you can be sure that there's a lot more to Controllers than what we have talked about in this article - it's only meant as an introduction to the concept and a way for you to get your first MVC project up and running. Later on in this tutorial, we will talk a lot more about Controllers!