This article is currently in the process of being translated into Vietnamese (~26% done).
TODO List: Models, ViewModels & Helpers
As promised, we'll be building a database-driven TODO List in this chapter. In the previous articles, we have made the necessary preparations, including setting up the database and adding support for the Dapper database framework to our project. Now it's time for the fun part: We'll start to do the actual coding!
A quick summary of the previous articles: By now, you should have an ASP.NET MVC Core project setup, preferably called "TodoList". In this project, you should have added the Dapper and Dapper.Contrib NuGet packages, and you should have setup a connection to the LocalDB database, in which you should have added a database (TodoList) with a table inside (TodoListItems).
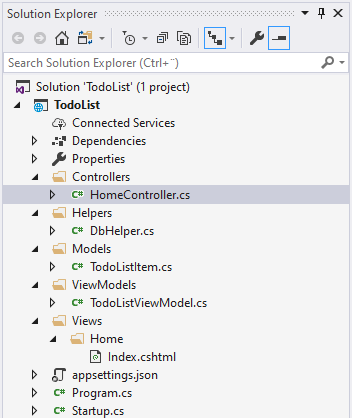
We'll now start to add files to your project, and we'll be adding even more in the upcoming articles. For reference, here's an idea of how your project structure should look when we're done:

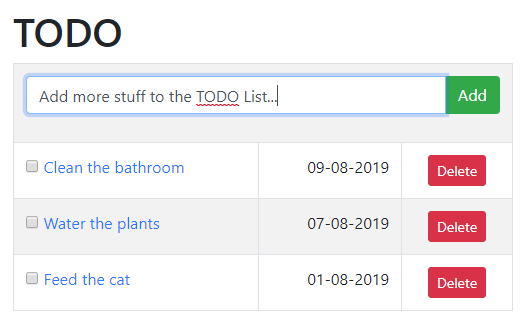
When we're completely done, we'll have a single-page TODO List web application. It will come with functionality for adding, editing and deleting items. Items will be displayed with a Title and the date where it was added, as well as a checkbox showing whether the item has been completed or not, which can be toggled with a single click. It will look like this:

Enough talk - let's get started!
Helpers
To obtain a connection to the database, we'll be creating a new instance of the SqlConnection class. It implements the IDbConnection interface and thanks to Dapper, this instance will therefore automatically be extended with all the great functionality found in the Dapper framework.
When instantiating the SqlConnection class, we'll need to provide a so-called connection string. This string contains the information needed to connect to the database in question: Most importantly, the IP/hostname of the database server, but normally also a username and a password, in combination with the name of the database to be used. However, since we're currently connecting to a LocalDB edition and not a full-blown SQL Server, we can leave out the username/password part and just provide the name of the instance, as well as the database we want to use.
The connection string is usually stored in a configuration file, but we won't get into that now. Instead, we'll implement a helper class called DbHelper, which can provide us with a properly initialized instance of the SqlConnection class, so we won't have to write the entire connection string each time we want to use our database. This very simple class only has one static method for now, and it looks like this:
using System;
using System.Data.SqlClient;

namespace TodoList.Helpers
{
    public class DbHelper
    {
    public static SqlConnection GetConnection()
    {
        return new SqlConnection(@"Data Source=(localdb)\MSSQLLocalDB;Initial Catalog=TodoList;");
    }
    }
}
Make sure that the connection string used matches the one needed on your computer. You can verify this by right-clicking your database in the SQL Server Object Explorer and selecting Properties. In the Properties Tool window that appears, check under Connection string - if it doesn't match, simply replace the one found in the code above with your own version.
Models and ViewModels
We need one Model in our project: The TodoListItem model. It's a .NET representation of the data we're storing in the database, so you'll recognize the property names from when we created the database table (TodoListItems). Here's how it should look:
using System;
using System.ComponentModel.DataAnnotations;

namespace TodoList.Models
{
    public class TodoListItem
    {
    public int Id { get; set; }

    public DateTime AddDate { get; set; }

    [Required]
    [MinLength(2, ErrorMessage = "Title must contain at least two characters!")]
    [MaxLength(200, ErrorMessage = "Title must contain a maximum of 200 characters!")]
    public string Title { get; set; }

    public bool IsDone { get; set; }
    }
}
Noticed that I have added some model validation data annotations to the Title property - since this is the only user-editable part of the class, we only need validation for this property. In this case, we we just need some basic validation of the length: A minimum length of 2, since it's hard to express something that needs to be done in less characters, and a maximum length of 200 to match the column in the database table, which has also been set to contain a maximum of 200 characters.
Chúng ta cũng cần ViewModel để giao tiếp giữa Controller và View:
using System;
using System.Collections.Generic;
using System.Data.SqlClient;
using System.Linq;
using TodoList.Models;
using Dapper;
using TodoList.Helpers;

namespace TodoList.ViewModels
{
    public class TodoListViewModel
    {
    public TodoListViewModel()
    {
        using(var db = DbHelper.GetConnection())
        {
        this.EditableItem = new TodoListItem();
        this.TodoItems = db.Query<TodoListItem>("SELECT * FROM TodoListItems ORDER BY AddDate DESC").ToList();
        }
    }

    public List<TodoListItem> TodoItems { get; set; }

    public TodoListItem EditableItem { get; set; }
    }
}
ViewModel này là container chứa hai thứ: danh sách TODO items đầy đủ (trong thuộc tính TodoItems) và thuộc tính EditableItem. Thuộc tính sau dùng để biểu diễn cho item được cập nhật, hoặc nếu không có item nào được cập nhật thì reference tới item tiếp theo được cho vào trong danh sách. Việc này cho phép chúng ta dùng form giống nhau ngay cả tạo mơi item hay sửa một item đã tồn tại.
Bạn cũng sẽ thấy đây là lần đầu tiên chúng ta làm việc với cơ sở dữ liệu! Nó xảy ra trong hàm tạo của ViewModel, vì mỗi khi ta cần ViewModel thì chúng ta cũng cần danh sách TODO. Chú ý cách dùng phương thức Query trong đối tượng db (SqlConnection): Đây là phương thức trong lớp Dapper cho phép chúng ta thực hiện câu truy vấn SQL (SELECT * FROM ...) lấy toàn bộ hàng trong bảng TodoListItems và sắp xếp chúng theo thứ tự giảm dần theo AddDate. Dapper sau đó sẽ thực hiện và tự động chuyển bảng trong cơ sở dữ liệu vào đối tượng .NET của lớp TodoListItem!
Summary
Với Model và ViewModel, cũng như lớp DbHelper, chúng ta sẵn sàng chuyển sang bước tiếp theo - trong bài tiếp là thêm View và Controller để hoàn thành dự án.