The community is working on translating this tutorial into Romanian, but it seems that no one has started the translation process for this article yet. If you can help us, then please click "More info".
TODO List: Models, ViewModels & Helpers
As promised, we'll be building a database-driven TODO List in this chapter. In the previous articles, we have made the necessary preparations, including setting up the database and adding support for the Dapper database framework to our project. Now it's time for the fun part: We'll start to do the actual coding!
A quick summary of the previous articles: By now, you should have an ASP.NET MVC Core project setup, preferably called "TodoList". In this project, you should have added the Dapper and Dapper.Contrib NuGet packages, and you should have setup a connection to the LocalDB database, in which you should have added a database (TodoList) with a table inside (TodoListItems).
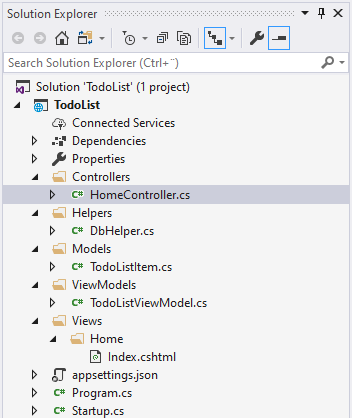
We'll now start to add files to your project, and we'll be adding even more in the upcoming articles. For reference, here's an idea of how your project structure should look when we're done:

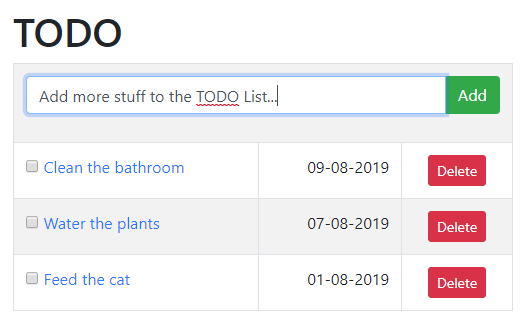
When we're completely done, we'll have a single-page TODO List web application. It will come with functionality for adding, editing and deleting items. Items will be displayed with a Title and the date where it was added, as well as a checkbox showing whether the item has been completed or not, which can be toggled with a single click. It will look like this:

Enough talk - let's get started!
Helpers
To obtain a connection to the database, we'll be creating a new instance of the SqlConnection class. It implements the IDbConnection interface and thanks to Dapper, this instance will therefore automatically be extended with all the great functionality found in the Dapper framework.
When instantiating the SqlConnection class, we'll need to provide a so-called connection string. This string contains the information needed to connect to the database in question: Most importantly, the IP/hostname of the database server, but normally also a username and a password, in combination with the name of the database to be used. However, since we're currently connecting to a LocalDB edition and not a full-blown SQL Server, we can leave out the username/password part and just provide the name of the instance, as well as the database we want to use.
The connection string is usually stored in a configuration file, but we won't get into that now. Instead, we'll implement a helper class called DbHelper, which can provide us with a properly initialized instance of the SqlConnection class, so we won't have to write the entire connection string each time we want to use our database. This very simple class only has one static method for now, and it looks like this:
using System;
using System.Data.SqlClient;

namespace TodoList.Helpers
{
    public class DbHelper
    {
    public static SqlConnection GetConnection()
    {
        return new SqlConnection(@"Data Source=(localdb)\MSSQLLocalDB;Initial Catalog=TodoList;");
    }
    }
}
Make sure that the connection string used matches the one needed on your computer. You can verify this by right-clicking your database in the SQL Server Object Explorer and selecting Properties. In the Properties Tool window that appears, check under Connection string - if it doesn't match, simply replace the one found in the code above with your own version.
Models and ViewModels
We need one Model in our project: The TodoListItem model. It's a .NET representation of the data we're storing in the database, so you'll recognize the property names from when we created the database table (TodoListItems). Here's how it should look:
using System;
using System.ComponentModel.DataAnnotations;

namespace TodoList.Models
{
    public class TodoListItem
    {
    public int Id { get; set; }

    public DateTime AddDate { get; set; }

    [Required]
    [MinLength(2, ErrorMessage = "Title must contain at least two characters!")]
    [MaxLength(200, ErrorMessage = "Title must contain a maximum of 200 characters!")]
    public string Title { get; set; }

    public bool IsDone { get; set; }
    }
}
Noticed that I have added some model validation data annotations to the Title property - since this is the only user-editable part of the class, we only need validation for this property. In this case, we we just need some basic validation of the length: A minimum length of 2, since it's hard to express something that needs to be done in less characters, and a maximum length of 200 to match the column in the database table, which has also been set to contain a maximum of 200 characters.
We'll also need a ViewModel. It will be used for communication between the Controller and the View:
using System;
using System.Collections.Generic;
using System.Data.SqlClient;
using System.Linq;
using TodoList.Models;
using Dapper;
using TodoList.Helpers;

namespace TodoList.ViewModels
{
    public class TodoListViewModel
    {
    public TodoListViewModel()
    {
        using(var db = DbHelper.GetConnection())
        {
        this.EditableItem = new TodoListItem();
        this.TodoItems = db.Query<TodoListItem>("SELECT * FROM TodoListItems ORDER BY AddDate DESC").ToList();
        }
    }

    public List<TodoListItem> TodoItems { get; set; }

    public TodoListItem EditableItem { get; set; }
    }
}
This ViewModel is basically just a container, which will store two things: The full list of TODO items (in the TodoItems property) as well as a property called EditableItem. The latter will be used to represent the item that's currently being edited, or if no item is being edited, a reference to the next possible item that will be added to the list. This will allow us to use the exact same form whether we're creating a new item or editing an existing one.
You will also notice that this is the first time where we actually communicate with the database! It happens in the constructor of the ViewModel, since each time we need this ViewModel we also need the TODO list items. Notice how i use the Query() method on the db (SqlConnection) object: This is actually a Dapper method, allowing us to supply an SQL query (the "SELECT * FROM..." part) that will fetch all the rows of the TodoListItems table and then sort them descending by their AddDate. Dapper will then perform its magic and automatically convert these database table rows into .NET objects of the TodoListItem class!
Summary
With the needed Model and ViewModel in places, as well as our DbHelper class, we're ready to move on to the next step - in the next articles, we'll be adding the View and the Controller needed to complete this project.