This article is currently in the process of being translated into Portuguese (~48% done).
Creating a Controller
No último artigo, criamos nosso primeiro projeto ASP.NET MVC. Foi criado uma funcionalidade para mostrar uma simples mensagem ao mundo, mas nós obviamente queremos mais do que isso. A primeira coisa relevante para adicionar ao novo, quase vazio projeto MVC (Model-View-Controller) é um Controller.
Tal como já haviamos dito, o Controlador atua como o intermediário - ele combinará o seu Modelo com a sua Vista e fornecerá o resultado ao usuário final. No entanto, nem o Modelo nem a Vista são necessários - O Controlador pode agir por conta pópria para as operações mais básicas, tais como, mostrar uma simples menssagem de texto ou redirecionar o usuário para outro lugar.
Não obstante, existem algumas coisas que precisamos fazer antes de adicionar um novo controlador no nosso projecto.
Adding MVC support to a Web project
No artigo anterior, criamos um novo projecto web usando um template vazio. Esta opção nos deixa com uma aplicação web muito básica, assim que necessitamos adicionar o suporte MVC a mesma, para fazer com que o .NET framework e o servidor web saibam como processar as petições entrantes e outras coisas mais. Lembras-te do ficheiro Startup.cs que havíamos modificado no artigo anterior? É momento de que o abras novamente no Visual Studio e procures pelo método ConfigureServices. Está completamente vazio, mas vamos modificá-lo adicionando (no arquivo) a seguinte linha:
services.AddMvc();Agora, o método deve ter o seguinte aspecto:
public void ConfigureServices(IServiceCollection services)
{
    services.AddMvc();
}
Temos de modificar também o método Configure() - anteriormente, continha algum código para mostrar a mensagem "Hello, MVC world!", mas queremos que, no futuro, seja o nosso novo Controlador que se encarregue dessa tarefa. A tua aplicação web tem de saber como mapear as requisições que chegam aos controladores e, para isso, utiliza o conceito de rotas. Falaremos sobre isso depois, porque é um tema um pouco complexo, por agora, usaremos algumas linhas de código, que podes encontrar abaixo, para adicionar a rota por defeito da aplicação. Assim que, modifica o teu método Configure() no ficheiro Startup.cs para que fique da seguinte maneira:
public void Configure(IApplicationBuilder app, IWebHostEnvironment env)
{
    if(env.IsDevelopment())
    {
    app.UseDeveloperExceptionPage();
    }

    app.UseRouting();
    app.UseEndpoints(endpoints =>
    {
    endpoints.MapDefaultControllerRoute();
    });
}
Finalmente, estamos prontos para adicionaro nosso primeiro controlador!
Adding a Controller
A estrutura do projeto de uma aplicaçao MVC depende de ti - se voçê quiser, podes colocar todos os controladores, modelos, vistas e outros ficheiros na raíz. Não obstante, sempre é uma boa ideia separar as coias em pastas relevantes, por exemplo, uma pasta "Controllers" para os teus controladores, uma pasta "Views" para as tuas vistas e assim sucessivamente. Assim que te acostumes com uma determinada estrutura, seja ela comun ou uma criada por você mesmo, te darás conta que será mais fácil navegares pelo projecto e trabalhar com os ficheiros.
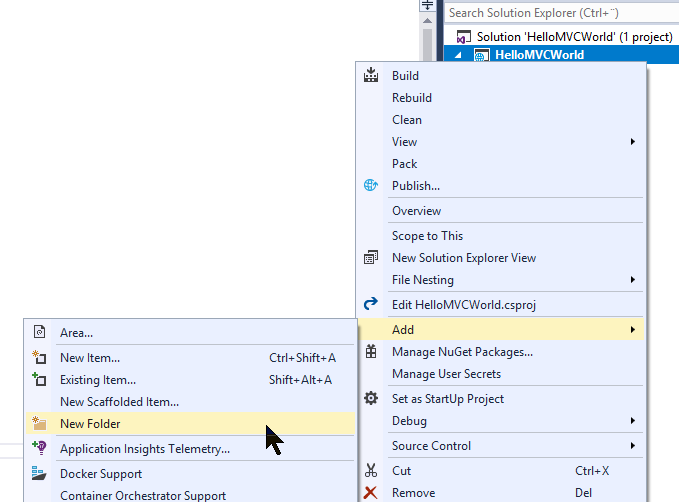
Para começar, vamos adicionar uma nova pasta ao seu projecto com o nome de "Controllers". Click direito no seu projecto em Spçution Explorer e seleciona Add -> New Folder, tal como se segue:

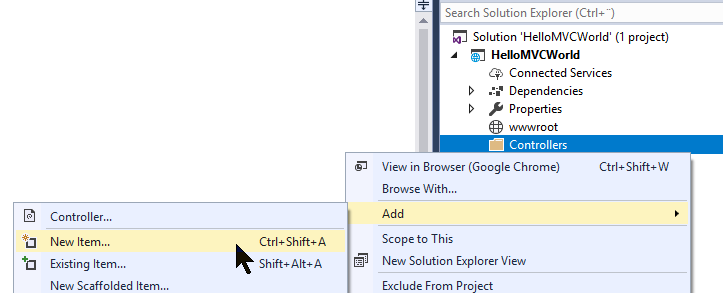
A dialog will pop up, requesting a name for the new folder - just enter "Controllers". With that in place, we can now finally add our very first Controller to the project. Just right-click the new folder and select Add -> New Item..., like this:

Visual Studio will offer to apply scaffolding to your new controller, which basically means that it can be created with a range of methods for doing various stuff. However, this tutorial is all about doing things from scratch, so you should select the one called something like "MVC Controller - Empty" and then click the Add button.
A dialog will pop up, requesting a name for the new controller. We would like to call it "HomeController", so enter that into the dialog and press Ok. A new Controller will be generated for you and it will look like this:
using System;
using System.Collections.Generic;
using System.Linq;
using System.Threading.Tasks;
using Microsoft.AspNetCore.Mvc;

namespace HelloMVCWorld.Controllers
{
    public class HomeController : Controller
    {
    public IActionResult Index()
    {
        return View();
    }
    }
}
As you can see, it looks like a regular C# class. It inherits the Controller class, which is how the .NET frameworks know that this class is to be treated as an MVC Controller. It has one method called Index(), which will try to return the default view by calling the View() method. The .NET framework will be able to find the proper view, if it exists, in one of the many places that it automatically looks for views. However, we have not reached the part of the tutorial where views are introduced, so let's instead change the method to return the, now famous, "Hello, MVC world!" message. Change the single line of the method so that it now looks like this:
public IActionResult Index()
{
    return Content("Hello, MVC world!");
}
That's all we need - we now have a Controller with an Index() method, which will be called when you run your project, thanks to the default routing we applied previously. Press F5 to run your project and see for your self - you should see our greeting to the world as soon as the default browser is launched.
Summary
We have now created the first part of an MVC project: The Controller. Real projects will likely contain more than just the one controller, but let's stick with it for now and then proceed to the next articles, where we will introduce first the View and then the Model. At this point, MVC might seem overly complicated, but as soon as you understand the basic principles, it will all start to make sense.
Also, you can be sure that there's a lot more to Controllers than what we have talked about in this article - it's only meant as an introduction to the concept and a way for you to get your first MVC project up and running. Later on in this tutorial, we will talk a lot more about Controllers!